Keep an eye on your k8s cluster with Falco

- TechAdvocate
- DevSecOps / Cloud platform Lead Architect @ Sopra Steria
- Speaker @ Devoxx, Snowcamp, Breizhcamp, GitLab Connect and internally
- Co-Founder of Volcamp IT Conference @ Clermont-Fd (https://volcamp.io)
- GitLab Hero
When running a Kubernetes cluster, you can expose yourself to too many problems. Controlling security is not simple, but some tools can help you in this journey. Falco is one of them. It is a mature solution, part of CNCF since 2018 at an Incubating level.
Falco is a tool supervising your platform (it can be a Kubernetes cluster but also more classic virtual machines). It detects some abnormal behavior based on a ruleset such as remote connection, rights modification or command execution.
In this article, I'll explain how to install it and demonstrate the first steps to use it on your cluster.
Install Falco in your cluster
Documentation is quite well made on Falco's official website, here are the steps to set it up in a Kubernetes cluster, but, FYI, you can also use it on virtual machines for instance.
Falco is based on Helm to install it, so we need to add the Helm repository
helm repo add falcosecurity https://falcosecurity.github.io/charts
helm repo update
Then we can install Falco components
# Force namespace creation with --create-namespace
helm install falco -n falco \
--set tty=true --create-namespace \
falcosecurity/falco
It can take some time to get Ready, when everything is ok, you should see
$ kubectl get all -n falco
NAME              READY   STATUS    RESTARTS   AGE
pod/falco-crw6r   1/2     Running   0          44s
pod/falco-rlh8m   1/2     Running   0          44s

NAME                   DESIRED   CURRENT   READY   UP-TO-DATE   AVAILABLE   NODE SELECTOR   AGE
daemonset.apps/falco   2         2         0       2            0           <none>          44s
Check events capture
Let's see if Falco works. We can try to generate an event like a connection to a container.
# Create a demo namespace
kubectl create namespace demo-falco
# Add a sample container
kubectl run falco-demo --image nginxdemos/nginx-hello
# Generate an access to falco demo running an uptime command
kubectl exec -it falco-demo -- sh -c "uptime"
If everything works fine, looking at Falco pods logs, we should see some new events
$ kubectl logs -l app.kubernetes.io/name=falco -n falco
{"hostname":"falco-pkq8g","output":"20:22:48.852518535: Notice A shell was spawned in a container with an attached terminal (user=nginx user_loginuid=-1 k8s.ns=demo-falco k8s.pod=falco-demo container=d64dad06ded3 shell=sh parent=runc cmdline=sh -c uptime pid=2562738 terminal=34816 container_id=d64dad06ded3 image=docker.io/nginxdemos/nginx-hello exe_flags=0)","priority":"Notice","rule":"Terminal shell in container","source":"syscall","tags":["T1059","container","mitre_execution","shell"],"time":"2023-07-06T20:22:48.852518535Z", "output_fields": {"container.id":"d64dad06ded3","container.image.repository":"docker.io/nginxdemos/nginx-hello","evt.arg.flags":"0","evt.time":1688674968852518535,"k8s.ns.name":"demo-falco","k8s.pod.name":"falco-demo","proc.cmdline":"sh -c uptime","proc.name":"sh","proc.pid":2562738,"proc.pname":"runc","proc.tty":34816,"user.loginuid":-1,"user.name":"nginx"}}
{"hostname":"falco-pkq8g","output":"20:22:48.852896700: Notice Unexpected setuid call by non-sudo, non-root program (user=nginx user_loginuid=-1 cur_uid=101 parent=<NA> command=sh -c uptime pid=2562738 uid=nginx container_id=d64dad06ded3 image=docker.io/nginxdemos/nginx-hello) k8s.ns=demo-falco k8s.pod=falco-demo container=d64dad06ded3","priority":"Notice","rule":"Non sudo setuid","source":"syscall","tags":["T1548.001","container","host","mitre_privilege_escalation","users"],"time":"2023-07-06T20:22:48.852896700Z", "output_fields": {"container.id":"d64dad06ded3","container.image.repository":"docker.io/nginxdemos/nginx-hello","evt.arg.uid":"nginx","evt.time":1688674968852896700,"k8s.ns.name":"demo-falco","k8s.pod.name":"falco-demo","proc.cmdline":"sh -c uptime","proc.pid":2562738,"proc.pname":null,"user.loginuid":-1,"user.name":"nginx","user.uid":101}}
{"hostname":"falco-pkq8g","output":"20:22:48.853552015: Notice Unexpected setuid call by non-sudo, non-root program (user=nginx user_loginuid=-1 cur_uid=101 parent=<NA> command=uptime pid=2562738 uid=nginx container_id=d64dad06ded3 image=docker.io/nginxdemos/nginx-hello) k8s.ns=demo-falco k8s.pod=falco-demo container=d64dad06ded3","priority":"Notice","rule":"Non sudo setuid","source":"syscall","tags":["T1548.001","container","host","mitre_privilege_escalation","users"],"time":"2023-07-06T20:22:48.853552015Z", "output_fields": {"container.id":"d64dad06ded3","container.image.repository":"docker.io/nginxdemos/nginx-hello","evt.arg.uid":"nginx","evt.time":1688674968853552015,"k8s.ns.name":"demo-falco","k8s.pod.name":"falco-demo","proc.cmdline":"uptime","proc.pid":2562738,"proc.pname":null,"user.loginuid":-1,"user.name":"nginx","user.uid":101}}
💥 Great it works! But it could be easier to use with a UI...
Configure UI
By default, Falco doesn't enable its UI. We can easily enable it by upgrading the helm installation
helm upgrade falco -n falco --set tty=true falcosecurity/falco \
  # 2 new arguments to enable UI
  --set falcosidekick.enabled=true \
  --set falcosidekick.webui.enabled=true
After a while, we can see many new components
$ kubectl get all -n falco

NAME                                          READY   STATUS    RESTARTS      AGE
pod/falco-2dpnq                               2/2     Running   0             21m
pod/falco-falcosidekick-795c485799-bgcwk      1/1     Running   0             22m
pod/falco-falcosidekick-795c485799-q25rg      1/1     Running   0             22m
pod/falco-falcosidekick-ui-5448d6cc4c-7j67b   1/1     Running   3 (22m ago)   22m
pod/falco-falcosidekick-ui-5448d6cc4c-ztwhp   1/1     Running   2 (22m ago)   22m
pod/falco-falcosidekick-ui-redis-0            1/1     Running   0             22m
pod/falco-pkq8g                               2/2     Running   0             20m

NAME                                   TYPE        CLUSTER-IP     EXTERNAL-IP   PORT(S)    AGE
service/falco-falcosidekick            ClusterIP   10.3.165.112   <none>        2801/TCP   22m
service/falco-falcosidekick-ui         ClusterIP   10.3.88.235    <none>        2802/TCP   22m
service/falco-falcosidekick-ui-redis   ClusterIP   10.3.97.117    <none>        6379/TCP   22m

NAME                   DESIRED   CURRENT   READY   UP-TO-DATE   AVAILABLE   NODE SELECTOR   AGE
daemonset.apps/falco   2         2         2       2            2           <none>          24m

NAME                                     READY   UP-TO-DATE   AVAILABLE   AGE
deployment.apps/falco-falcosidekick      2/2     2            2           22m
deployment.apps/falco-falcosidekick-ui   2/2     2            2           22m

NAME                                                DESIRED   CURRENT   READY   AGE
replicaset.apps/falco-falcosidekick-795c485799      2         2         2       22m
replicaset.apps/falco-falcosidekick-ui-5448d6cc4c   2         2         2       22m

NAME                                            READY   AGE
statefulset.apps/falco-falcosidekick-ui-redis   1/1     22m
We can see that falco-falcosidekick-ui is exposing 2802 port. By default Falco doesn't provide an ingress to expose the UI externally, for security reasons in a production environment. You can in that case use port-forwarding mechanism to access it.
kubectl port-forward svc/falco-falcosidekick-ui \
  -n falco --address 0.0.0.0 2802 &> /dev/null &
In my case, and as it's a demo, I prefer to have it accessible globally. We can easily add an Ingress to our namespace
apiVersion: networking.k8s.io/v1
kind: Ingress
metadata:
  name: falco
  annotations:
    kubernetes.io/ingress.class: nginx
    cert-manager.io/cluster-issuer: letsencrypt-production
spec:
  rules:
    - host: falco.mydns.fr
      http:
        paths:
          - backend:
              service:
                name: falco-falcosidekick-ui
                port:
                  number: 2802
            pathType: Prefix
            path: /
  # Add this part to enable TLS
  ## Uncomment this to enable TLS
  tls:
    - hosts:
        - falco.mydns.fr
      secretName: nginx-demo-tls
Now, apply it to our Falco namespace
kubectl apply -f ingress-falco.yml -n falco
With the mechanisms I've explained in my previous articles, I'm able to access it through the URL https://falco.mydns.fr

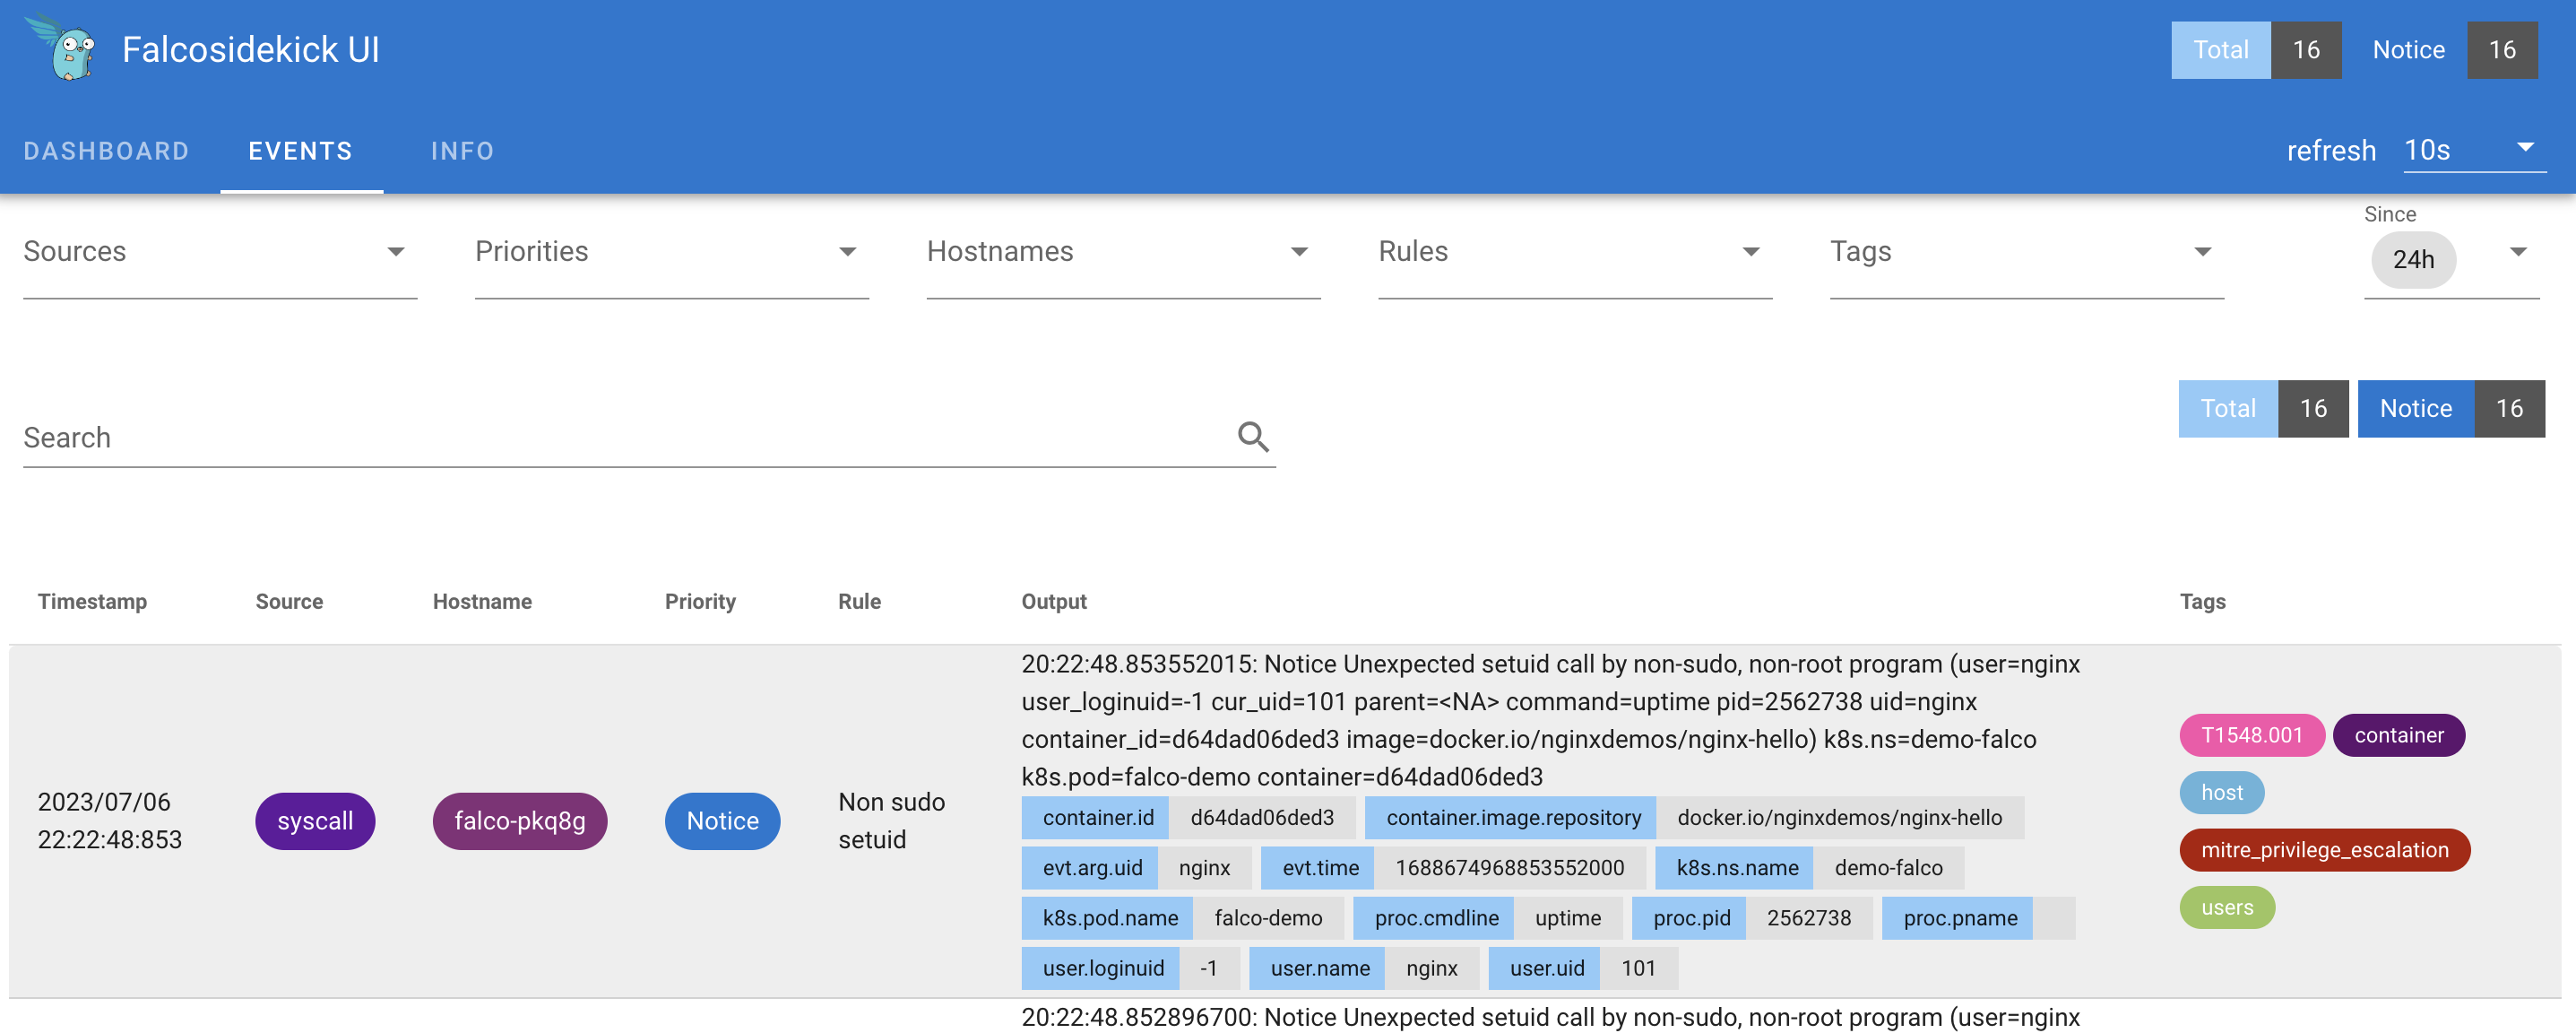
😎 It works! We can now connect to it with the classic admin/admin credentials. Going to the Events tab, we can find the previous events we have generated previously. Falco automatically tags and prioritize all events for us to ease the analysis and detect serious ones quickly.
ℹ️ Note that you can change these credentials when deploying the UI.
helm upgrade falco -n falco --set tty=true falcosecurity/falco \
  --set falcosidekick.enabled=true \
  --set falcosidekick.webui.enabled=true \
  --set falcosidekick.webui.user=superuser:veryverystrongpassword
Conclusion
With this quick introduction, you can see that with Falco you can easily set up a basic security supervision of a Kubernetes cluster. Here we use the default configuration, but playing with Falco configuration you can configure your instance with a fine-grained approach. Have a look at https://github.com/falcosecurity/charts/blob/master/falco/values.yaml to see all customizable values
In this demo, I use the default behavior to log alerts into stdout but also by managing the configuration you can set up one or several outputs and for instance, send your alerts to an HTTP endpoint of your centralized supervision tool.
🙏 As usual thanks to OVHcloud to support me for this article redaction.
At the time of this article, Falco was in version 0.35.1


